Unity’s ECS architecture is nearing its official release, and I am getting more and more excited for it. After a brief introduction, we’ll spend some time digging in and experimenting. By the end you should have an elementary grasp of Entities, Components and Systems within this new architecture.
What is Unity’s ECS
ECS stands for Entity Component System, which is a popular architecture used for game development. I’ve been using my own implementation, based on Adam Martin’s blogs for a while now an have really enjoyed the pattern.
If you’re not already familiar with this pattern, then this quick overview might help:
An Entity is basically just an “id”, it uniquely identifies some concept of a thing in the world, but by itself doesn’t mean or do anything. In practice this will be a replacement for the GameObject. Unity has implemented it as a struct called an “Entity”. See more here.
A Component holds data. All data should live in a component, and ONLY data should live in a component. If you look at an old Monobehaviour, imagine keeping just the fields by themselves. In practice, these will be implemented as structs that conform to the “IComponentData” interface. See more here.
A System handles the behaviour of entities that have a particular collection of components. For example, a rendering system will render all entities that have information about a mesh and material. If you look at an old Monobehaviour, imagine putting just the methods into a system, and having a single system work for all matching entities, not just a single GameObject. In practice, these will be implemented as a subclass of “ComponentSystem”. See more here.
Why is that so awesome?
So why is this a good thing? If you’re worried that it will require a whole new learning curve to get the pattern right, or are worried about losing the benefits of object oriented code, or think that this couldn’t possibly be as fast for prototyping, etc, then I would say you’re probably not wrong. You’ll have to decide for yourself whether or not the pattern is a good fit for you based on what it can offer.
Performance is one of the first benefits that stands out. If you use this pattern, Unity will be able to do some ridiculously optimized things under the hood that you wont have to think about. Using traditional Unity development (with the GameObject) you will find that a game with lots of objects, say 10’s of thousands, is already running very slowly – if at all. Yet I have seen demos of the ECS running with 100’s of thousands of objects and maintain silky smooth frame rates.
Another benefit, is one which is promised to be coming, but which to my knowledge is not yet demonstrated – networked multiplayer. There are A LOT of challenges with making a networked multiplayer game, and Unity is trying to solve these challenges within the ECS pattern. For example, all of the ECS code will run deterministically, or in other words, it will always run the same way, even on different computers.
You can read more about both of these benefits, and plenty more, on Unity’s documentation here.
How to use it?
At the time of this writing I am using Unity 2018.2.14f1. I point this out, because this feature has not been officially released yet. It is still in development and may be subject to change. In fact, a lot of the tutorials you will find online mention a bunch of hurdles to jump through which are no longer needed. For example, you shouldn’t have to find a special beta version of unity – just grab the normal installer from the website. You also wont have to copy manifest files to get things configured – everything that needs to be done, can be done right inside of the Unity editor.
Project Setup
So, assuming you have the same or newer version of Unity, here is how to start playing around with the feature:
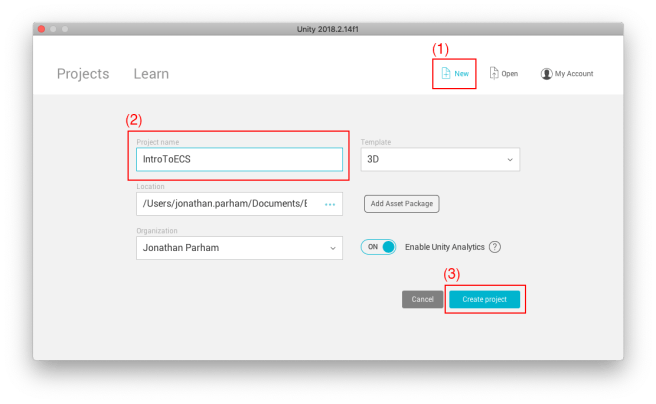
First, create a new project. When you open Unity, just click the “New” project button (1) on the initial dialog, and provide whatever project name (2) you want, then click the “Create project” button (3):
The ECS code requires some newer C# features. We can enable this within the Editor, just use the menu bar and choose “Edit -> Project Settings -> Player” to open the “PlayerSettings” in the inspector. Then look inside the group titled “Other Settings”, and under the section “Configuration”, for the “Scripting Runtime Version *”. Set this value to “.NET 4.x Equivalent”, then allow Unity to restart.

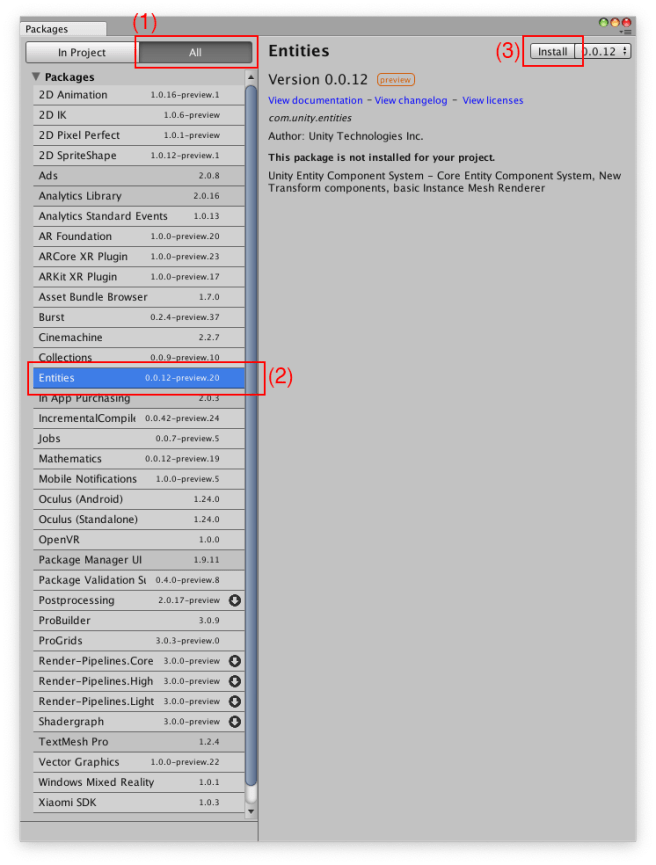
Now, because the ECS feature is still in development, we will have to manually enable it. Luckily we can do this right in the editor as well. From the menu bar, choose “Window -> Package Manager”. In the dialog that appears, choose the “All” packages button (1), select the “Entities” package (2), and then click the “Install” button (3). The very first time you do this, it might take a while to complete, but subsequent installs will be faster.
That’s it! You can already start to play with the new feature, but one last tip – you will probably want to use the Entity Debugger pane. You can find it from the menu at “Window -> Analysis -> Entity Debugger”. I would recommend docking the pane somewhere in the interface, such as grouped along with the Hierarchy pane. In fact, you can think of this pane as a sort of replacement for the Hierarchy pane when dealing with Pure ECS.
Get Started
Let’s begin with one of the simplest ways to create an Entity – via the editor. Create a new Capsule from the menu: “GameObject -> 3D Object -> Capsule”, and then change its name to “Player”. Currently we’ve only created a standard unity GameObject, not an Entity. However, there is a new component you can add to the GameObject that would create an Entity. With your “Player” object selected, use the Inspector pane to “Add Component” and add the “Game Object Entity” script.
Even without entering “Play” mode, you can see an Entity has been added. Look in the “Entity Debugger”, select the “EntityManager” system, and see “Entity 0” has appeared.

Congratulations on making your first Entity! Dont get too excited though, we haven’t actually done anything beyond creating an “ID” of “0”. None of the rest of the “GameObject” including its position in 3D space, Mesh, Material, Collider, etc are using the new ECS. In fact the only reason that anything appears at all is thanks to the traditional GameObject setup.
The point of adding the Entity script to this GameObject is merely to provide us an easy way to configure our content through the editor like we’ve always done. Just like an “Entity” will serve as a replacement for a “Game Object”, there are new kinds of Components that will replace the Traditional ones seen here.
With the “Player” object still selected, use the “Add Component” button to add a “Mesh Instance Renderer Component” script. We’ll have to configure it manually. Begin clicking the little dot to the right of the Mesh field (1), and then in the “Select Mesh” dialog that appears, choose the “Capsule” mesh (2).

Next, create a new Material. I named mine “Player” (1), gave it a yellow color for Albedo (2), and then enabled GPU Instancing (3) under the Advanced Options. Drag and drop the material from the Project pane to the Material slot of your Mesh Instance Renderer Component.

Now we have the necessary information to display a 3D object using ECS, but it wont display yet. If you turn off the “Mesh Renderer” on our initial GameObject then no objects will remain visible! What’s wrong? Well, it turns out that we haven’t actually attached a rendering component to an entity, we’ve just piggybacked off of Unity Components to make it easy to configure a component. What we are actually working toward creating is a shared component which we can use sort of like a “Prefab”. We could have a LOT of these capsules and only need one shared component that held the capsule and material reference!
Create a new script called “Bootstrap”. If you look at any of Unity’s sample projects you will find similar scripts by the same name. It is used for the initial setup. For now, leave the script as a MonoBehaviour, and attach it to the “Main Camera” in the scene. This will demonstrate that you can mix traditional workflows with new ECS content if you wish.
[csharp]
using UnityEngine;
using Unity.Entities; // EntityManager
using Unity.Rendering; // MeshInstanceRenderer
using Unity.Transforms; // Position & Rotation
public class Bootstrap : MonoBehaviour
{
void Start ()
{
var em = World.Active.GetOrCreateManager
var playerArchetype = em.CreateArchetype(typeof(Position), typeof(Rotation));
var player = em.CreateEntity(playerArchetype);
var playerLook = GetLookFromPrototype(“Player”);
em.AddSharedComponentData(player, playerLook);
}
MeshInstanceRenderer GetLookFromPrototype(string protoName)
{
var proto = GameObject.Find(protoName);
var result = proto.GetComponent
Object.Destroy(proto);
return result;
}
}
[/csharp]
In the code above, you should note that there are several new “using” statements that you may never have seen before. I added comments next to each one showing what it was necessary for, such as needing to use “Unity.Entities” in order to access the “EntityManager”.
I used the “Start” method as my entry point. The first step was to grab a reference to the “EntityManager” which enables us to create and configure ECS Entities and their components. It also creates Prefab-like “Archetype” structures. Archetypes are sort of like recipes for creating entities that always have the same base configuration of components. We create one here and pass in the types of Components we want to be present. The “Position” and “Rotation” are ECS components that serve the same purpose as the similarly named fields of a traditional “Transform” Component. In this example, I have left the archetype as a local field, but in a real game, I would probably want to keep it around longer in case I needed to instantiate more entities over time.
Then, we used the “CreateEntity” method of the “EntityManager” and pass it our Archetype to serve as the prototype. The result is a new ECS entity which already has both a Position and Rotation component attached.
In order to get our Mesh and Material information from the GameObject, we will use the “GetLookFromPrototype” method. It uses some traditional Unity code such as “GameObject.Find” to grab the GameObject in the scene. Then we use GetComponent to grab the “MeshInstanceRendererComponent” where we configured the Mesh and Material – but this is still a MonoBehaviour Component. The “Value” it provides is an ECS Component called a “MeshInstanceRenderer”. Note that the ECS version lacks the “Component” suffix. Before returning the “MeshInstanceRenderer”, the GameObject is destroyed from the scene because it is no longer needed.
For the final step, we use “AddSharedComponentData” to add the “MeshInstanceRenderer” to our entity. Because it is “shared” it will be reusable and we need only a single component for potentially many entities.
If you run the scene now, you should still see the capsule right in the middle of the screen. However, the capsule you will see is an ECS entity, not the GameObject! To verify, check out the Hierarchy pane and you should see that the “Player” GameObject has been destroyed. You can also look in the “EntityDebugger”, select the “EntityManager” system, and then the “Entity 1” and view its configuration in the Inspector:

Unfortunately, you can’t select or manipulate the ECS object directly in the Scene view. Even worse, all of the fields in the inspector are greyed out – you can’t actually edit anything for an ECS entity like you can with a normal GameObject. At least not yet – hopefully this will all be resolved by the time that the feature is officially released.
Pure ECS
I believe that Unity is looking for ways to work 100% without GameObjects and MonoBehaviours for Pure ECS architectures. To try this out, first remove the “Bootstrap” component from the Main Camera in the scene, then open the script for editing. We’ll start with a few changes including:
- Mark the class as sealed
- Remove the inheritance from MonoBehaviour
- Make the methods all static
- Add static methods with special new tags as new entry points
[csharp]
using UnityEngine;
using Unity.Entities; // EntityManager
using Unity.Rendering; // MeshInstanceRenderer
using Unity.Transforms; // Position & Rotation
public sealed class Bootstrap
{
[RuntimeInitializeOnLoadMethod(RuntimeInitializeLoadType.BeforeSceneLoad)]
public static void Initialize()
{
Debug.Log(“Initialize”);
}
[RuntimeInitializeOnLoadMethod(RuntimeInitializeLoadType.AfterSceneLoad)]
public static void InitializeAfterSceneLoad()
{
Debug.Log(“InitializeAfterSceneLoad”);
Start();
}
public static void Start()
{
var em = World.Active.GetOrCreateManager
var playerArchetype = em.CreateArchetype(typeof(Position), typeof(Rotation));
var player = em.CreateEntity(playerArchetype);
var playerLook = GetLookFromPrototype(“Player”);
em.AddSharedComponentData(player, playerLook);
}
private static MeshInstanceRenderer GetLookFromPrototype(string protoName)
{
var proto = GameObject.Find(protoName);
var result = proto.GetComponent
Object.Destroy(proto);
return result;
}
}
[/csharp]
Other than the few bullet points mentioned above, this script is pretty similar to the first version. Note that marking the class as sealed isn’t a requirement to enable any of the new features – I mostly did it because I was following along with Unity’s samples and they had also done it. The purpose of a sealed class is to restrict inheritance, so I suppose this may be to avoid potential conflicts with multiple entry points.
The most important additions to review are the new tags:
[csharp]
[RuntimeInitializeOnLoadMethod(RuntimeInitializeLoadType.BeforeSceneLoad)]
[RuntimeInitializeOnLoadMethod(RuntimeInitializeLoadType.AfterSceneLoad)]
[/csharp]
These are useful to provide good starting places for your code. You can create things both before and after the scene loads, which may be a bit like using an “Awake” and “Start” from traditional Unity workflows. All I’ve used these for is to print Debug Log messages showing that they were invoked when you run the scene, and then to call the “Start” method. Go ahead and run the scene and verify that the ECS entity and its components are created, just like they were before.
Manual ECS
Now let’s do something a bit more goal oriented. We will build a “Timer”. This should be pretty trivial, but can be used in any number of scenarios including to spread out enemy spawns, wait for hero cool downs and firing-rates, dynamic animations, etc.
Begin by creating a new script called “TimerSystem” and add the following:
[csharp]
using Unity.Entities;
public struct Timer : IComponentData
{
public float Value;
}
#pragma warning disable 649
public class TimerSystem : ComponentSystem
{
struct Data
{
public readonly int Length;
public ComponentDataArray
}
[Inject] private Data m_Data;
protected override void OnUpdate()
{
float dt = UnityEngine.Time.deltaTime;
for (int i = 0; i < m_Data.Length; ++i)
{
var timer = m_Data.Timers[i];
timer.Value += dt;
m_Data.Timers[i] = timer;
}
}
}
#pragma warning restore 649
[/csharp]
Let’s start with the Component – I created a struct called “Timer”. Our “Timer” holds a single data field called “Value” of type “float”. This will represent an amount of time passed in seconds. The struct implements the “IComponentData” interface which is necessary for all of your ECS Components. Noting that it is a struct, not a class, is pretty significant. There are important differences between structs and classes, such as that structs are passed by value rather than reference. That means that you will need to grab a copy of a component, edit the copy, and then assign the copy back much like you may have done with Vector3’s in the past. Hopefully that wont be too much of a problem because it comes with some nice performance benefits. Not only will garbage collection not be an issue, but the data can be passed around in highly optimized ways.
Then I created a “TimerSystem” which is a class that inherits from “ComponentSystem”. Unity will auto-magically instantiate a single instance of the system for you, and you should be able to find it listed in the Entity Debugger when you play your scene.
Inside of the “TimerSystem” I have defined another struct called “Data” which the system will operate upon. The Data struct includes a readonly int called “Length” which will be the number of entites that exist in our World which contain whatever grouping of components I specify. In this case, I have only specified a single component requirement, but I could have specified more than one or even specified entities with components to exclude. In this case I merely specified that I wished to work with all Entities containing a Timer component (regardless of the rest of its composition) by adding the single generic “ComponentDataArray” entry.
The method by which our system obtains these references is called injection, which you can see by the new “[Inject]” tag marking our local field “m_Data”. This also feels a bit like magic – you dont need to do anything accept that believe that Unity is passing everything correctly to you on each and every frame. If you add a Timer component to a new Entity, it will appear in the Timers array on the next frame. If you remove a Timer component from an Entity, it will not appear in the Timers array on the next frame. Easy right?
Much like MonoBehaviours have an “Update” method called each frame, our ComponentSystems will have an “OnUpdate” method called each frame. I have implemented the method in this system, loop over the entities injected to the system, and increment their Timer Value by the amount of deltaTime that has passed.
You might be wondering why I wrapped the class with the following pragma statements:
[csharp]
#pragma warning disable 649
#pragma warning restore 649
[/csharp]
This silences a compiler warning: Warning CS0649: Field ‘TimerSystem.Data.Length’ is never assigned to, and will always have its default value 0 (CS0649). If the “Length” property were not marked as “readonly” we wouldn’t need to silence the warning, but it would also cause some of Unity’s behind-the-scenes magic to fail and the system would no longer properly update. We need the exact signature for Length as it is listed here.
Additional Tips
When creating the Data struct for your component systems, you can specify one or more generic “ComponentDataArray” entries. Only entities containing all of the specified generic components will be included. You can also specify one or more “SubtractiveComponent” entries. Entities having any of the listed subtractive components will be excluded from injection. You may also wish to add an “EntityArray” to your Data struct to allow you to work with the Entity itself.
Component Systems are optimized such that they only run when there is data injected to them. If there were no “Timer” components on an Entity, then our “TimerSystem” wouldn’t update. If you want your system to run even without any injected data, then you can add the tag: [csharp][AlwaysUpdateSystem][/csharp].
If you need to control the order that systems update, you can use the tags: [csharp][UpdateBefore(typeof(OTHER_SYSTEM_HERE))][/csharp] or [csharp][UpdateAfter(typeof(OTHER_SYSTEM_HERE))][/csharp].
You aren’t supposed to access the “EntityManager” from within your systems. If you need to add or remove components or entities in a system, you will use something called “PostUpdateCommands” instead. For example: [csharp]PostUpdateCommands.DestroyEntity(m_Data.Entities[i]);[/csharp]
For even greater performance, there are “JobComponentSystem” systems. These may contain Jobs which can benefit from the [csharp][BurstCompile][/csharp] tag.
If you haven’t already downloaded the samples repository that Unity provided, I would highly recommend you download it and take a look. There are a variety of different examples to learn from. In particular, there is a “TwoStickShooter” folder which contains an example of a mini-game that was created three different ways: Traditional, Hybrid ECS, and Pure ECS. Seeing the same game with each type will be really helpful in highlighting the differences between their architectures.
Summary
In this lesson I introduced Unity’s upcoming ECS architecture. Even though the feature is not officially released, it is possible to enable it and experiment with it in current Unity releases. After our quick introduction to the architecture and its benefits, I walked through a quick sample where we created some ECS entities. We made an Entity with the usual things like a Position, Rotation, and Mesh Renderer, as well as a completely custom Entity, Component and System from which we made a Timer.
The sample project from this lesson is available as a zip file here.
If you find value in my blog, you can support its continued development by becoming my patron. Visit my Patreon page here. Thanks!
i believe inject is gonna be deprecated soon thou.
https://coffeebraingames.wordpress.com/2018/11/25/unity-ecs-basic-chunk-iteration/
Well, greater flexibility is not a bad thing, despite a bit more code. I guess we’ll just have to wait and see. Thanks for the link!
This is great, I definitely appreciate it. I am definitely a big fan of how you go about explaining things and the examples you use! It really helps things “sink in”.
There have been some pretty major updates recently (last 2 weeks or so), such as there is no longer a need for a bootstrapper, there is no more MeshInstanceRenderer, etc. Is it possible to make an updated version to reflect this?
I have also been looking for a tutorial on using the hybrid approach as it relates to a vehicle (just happens to be my current situation). I have a vehicle that was a prefab, I had to make an empty game object, I added GameObject Entity to it, I added the new RenderMesh (which replaced MeshInstanceRenderer ), added Position, Rotation, and MovementSpeed.
It works well, I can make my object move with a simple job, the issue is now my vehicle is just the body of a car because in RenderMesh component you only add a single mesh. My original cars parent object was the body, but the children were the windshield, each wheel, the steering wheel, etc. I don’t know how to make my car a complete car again using this system and can’t seem to find any tutorials on what to do other than I came across an ECS component called “Attach”, but I am not quite sure how to use it.
Is it at all possible to make a tutorial on how to make a bit more complex gameobject work within hybrid ECS?
Thanks!
Glad you enjoyed it! I was definitely planning to do a bigger something when it was officially released. I’ll try to get some time to look at the updates while we wait, but I can’t promise anything of course 🙂
@MostHated or anyone else, do you have a link to something explaining the depreciation of the bootstrapper and what the alternative is?
Also great article! really helped me out. 🙂
I wasn’t sure about that either, but you can probably keep up-to-date here:
https://github.com/Unity-Technologies/EntityComponentSystemSamples/blob/master/Documentation~/index.md
Hello Jon!
Your Pokemon BoardGame project was done at 2017, slightly before Unity 2018’s implementing of ECS.
Would it be helpful for me to understand ECS system though? Is the Pokemon project done by pure ECS system? (I guess it will be pure, because I guess that hybrid concept might be introduced by Unity developers to support old Unity projects..)
Actually I don’t need pros of ECS right now for my target project, but I feel that it’s necessary to get familiar with the concept. All the directions seems going toward this new trend..
I’m really a beginner even at the OOP concept. Probably either learning curve – OOP or ECS – might be not that different for me, both will be difficult! 🙂
What will be a good pathway for the beginner do you think?
A) Complete a small project with OOP (has many tutorials & examples already), then implement ECS later when necessary
B) Run into ECS right now, complete a small project with that concept coping with problems one by one!
Great questions. My current opinion is that you should feel free to try both. Typical OOP with Unity tutorials are very easy to follow along with and are very intuitive. To help you feel capable of actually accomplishing stuff, I think that is a great place to start. It will be a while before Unity’s ECS is production ready, and even then I think they will be supporting the old architecture for a while at least.
My Unofficial Pokemon Board Game is a great way to learn the most important concepts behind ECS. I think it is much easier to learn than the Unity version of ECS and has the benefit of being a “complete” (minus the copyrighted assets) project with saved files and everything. I’m not aware of any Unity ECS tutorials at that kind of scope. Keep in mind of course that the actual implementation will feel very different from Unity’s implementation – for example I don’t use jobs, but you can always adapt when the time comes.
I decided to start my first project with typical OOP type, right after I finish TACTICS RPG tutorial, to avoid my motivation being decayed by feeling of endless learning without actual work.. 🙂
Even when I’m working on my project, however, it seems that I have to learn all those new stuffs everyday not to be fallen behind!
It’ll be really important to manage my time & energy..
Thank you for the kind reply!